Install Android 8.1 on VMware Fusion
Tested on macOS High Sierra & VMware Fusion 10.1.2

So it started when I had to bring my phone back for repairs. I didn’t had any android phone, and some apps that I actually needed, where not available on any other OS. So I decided to virtualize the Android with VMware Fusion for mac, also known as Workstation on Windows. Btw, if video’s are more your thing, check out the youtube video that I made.
Step 1. Download a proper ISO
There are a few ways how you can deploy the OS, but my favorite way is by just simple installing it on a VM with virtualized hardware based on FreeBSD. So one site that I can definitely recommend is http://www.android-x86.org/. There you can find all the latest ISO’s that are available.
Step 2. Open up VMware Fusion / Workstation and create a new VM
2.1 Deploy a new vm.

2.2 Select Install from Disc

2.3 Load the ISO by clicking the “Use Another disc or disc image…”. You will see that after you’ve selected the ISO, it will detect the type of Virtual Hardware it is going to need to deploy the machine. That’s why I prefer this vs. the “Create a custom virtual Machine” option, because this way you are more certain that you’ve selected the proper Virtual Hardware. After that select “Continue”.

2.4 Select “Legacy BIOS” and click Continue.

2.5 This screen will show you the current settings for this virtual machine. We need to ramp it up with a little bit more specs, otherwise it won’t be able to bootup. So we are going to Change the amount of Memory and turn on 3D Acceleration for your screen. You can also increase the amount of processors, but that is less necessary. So instead of Finish, you best click “Customize Settings”. If you don’t, it will boot up the machine with the current settings and you have to change it afterwards. Best to do it into one go.

2.6 It will ask where you want to store machine, and what kind of name you want to give it.
Click save afterwards.

Step 3. Customize Virtual Hardware Settings
After that the vm is listed into your machine library, and it will prompt this screen if you have chosen, customize settings.

First select “Processors & Memory”.
3.1 Change to amount of memory. I changed it to 1GB. You can also change the amount of processors, but I wouldn’t go above 2. After that, click “Show All” and you go back to the previous screen.

3.2 Click on Display and you will see the following Screen.
Turn on 3D-Acceleration, and increase the Shared Graphics Memory. I increased it to 1gb as well, this way I know it going to be much faster during the bootup and it will go past the Android screen, which a lot of people tend to get stuck in. After that you’re done. The ISO is already selected because we selected to deploy from ISO, and the internet is automatically being shared with the VM trough NAT. 
Step 4. Installing and configuring the Android VM.
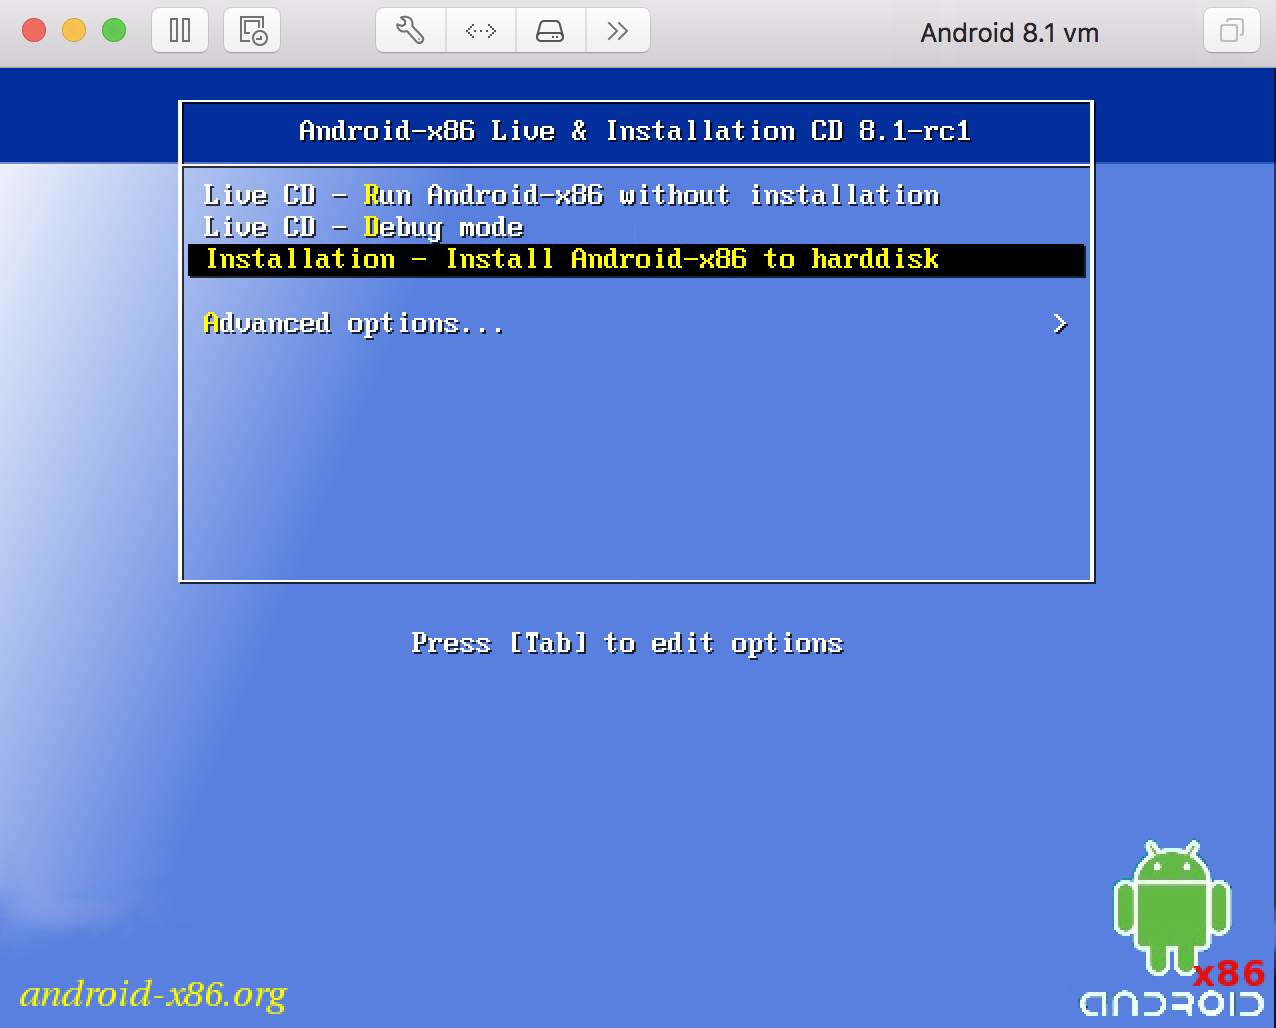
4.1 When you boot up the machine, you will see the following Screen.
Select Installation and press enter.
4.2 We’ve given the vm 20GB of disk space (Thin), but currently, this amount of space has not been assigned. So we’re going to create a new partition. Select “Create/Modify Partions” and press enter.

4.3 Select no for the use of GPT. This tend to have some problems when installing the vm.
4.4 Lets create a new partition by selecting “New”.

4.5 Select Primary

4.6 Select the size that you want for the new partition. I’ve selected it all and pressed enter. 
4.7 Then you have to configure your partition. First you want to make it bootable, select “Bootable” and under the head “Flags” it should show “Boot”. After that press the arrow keys until you’ve selected the “Write” tab. This will create the partition table, which make sure that you can use the new partition for the installation of Android 8.1.

4.8 Type “yes” and press enter.

4.9 After that select “Quite” and you will return to the installation screen of android, with a partition available called sda1

4.10 Select sda1 and press enter for the installation to start.

4.11 Select ext4 as the filesystem

4.12 Format ext4 by pressing “Yes”

4.13 Install the boot loader Grub

4.14 Make the system Read-Write.

4.15 Once it is finished, you can choose to reboot the machine or run Android.
Both options will start up the OS.

4.16 If you’ve gave it enough resources, and you configured it properly it should give you The Famous Android Screen.

4.17 Once it is past that you should see the first welcome screen.
The only thing for you left to do is, the configuration. Which is pretty self explanatory.

4.18 Once the configuration is Finished, you should see the following screen,
which means that you’ve installed your first Android vm. Congrats😊.

That’s it, that’s al there is to it.
The only thing that is note worthy, is that the “Play Store” App can be kinda buggy. And without the play store, you can’t install much apps do you. One way to work around that issue, is by opening up the play store on the web with google chrome. There the play store works perfectly, and you can still install the apps that you need.
Alright, I hope this was useful for you. If you have any questions, please let me know. There is also a video tutorial which you can check it out as well, and otherwise, I will see you next time. Bye.

Samir is the author of vSAM.Pro & a Life enthusiast who works as a consultant in the field of IT. With a great passion for Tech & Personal Development, he loves to help people with their problems, but also inspire them with a positive outlook on life.
Besides that, he is also a big Sport & Music junky that loves to spend a big chunk of his time on producing music or physically stretching himself.
Thanks for creating guide and posting it.
I’ve followed all the steps carefully however after step 4.15 booting to Android I only see a black screen.
I’m installing this on a MacBook Pro (retina), macOS 10.13.6, Fusion 11.0.2, Android 8.1-rc2 (android-x86_64-8.1-rc2.iso).
What’s do you feel might be the issue? Up until step 4.15 everything when smoothly. I’ve checked the RAM, DISPLAY and DISK SPACE requirements and they all match your suggestions.
Between the following 2 website solutions, I got this black screen issue fixed by editing the /mnt/grub/menu.lst file to force proper vga settings:
https://android.stackexchange.com/questions/144535/android-x86-marshmallow-not-booting-on-virtualbox-and-vmware-workstation
https://helloworldhelp.wordpress.com/2018/08/22/how-to-change-the-screen-resolution-dpi-on-android-x86/
Boot with xForce Mode
These steps are REQUIRED to get things to boot correctly, at least for me.
Press “e” button to edit this command before booting.
Press E Button
Press “e” button again, and move the cursor to left-hand.
Press e button again
Replace “quiet” parameter with “nomodeset xforcevesa”, then press “Enter” to save and press “b” button to boot.
Awesome! That worked for me. Thank you!
Happy to hear that it helped 🙂
Thanks a lot! This solve the problem for me
Reply to:
Nadia @2 January 2019 at 02:23
Thanks for creating guide and posting it.
I’ve followed all the steps carefully however after step 4.15 booting to Android I only see a black screen.
I’m installing this on a MacBook Pro (retina), macOS 10.13.6, Fusion 11.0.2, Android 8.1-rc2 (android-x86_64-8.1-rc2.iso).
What’s do you feel might be the issue? Up until step 4.15 everything when smoothly. I’ve checked the RAM, DISPLAY and DISK SPACE requirements and they all match your suggestions.
Reply to:
Nadia @2 January 2019 at 02:39
Boot with xForce Mode
These steps are REQUIRED to get things to boot correctly, at least for me.
Press “e” button to edit this command before booting.
Press E Button
Press “e” button again, and move the cursor to left-hand.
Press e button again
Replace “quiet” parameter with “nomodeset xforcevesa”, then press “Enter” to save and press “b” button to boot.
Reply From:
Samir of vSAM.pro @2 January 2019 at 04:56
Hey thanks for the compliment and checking out my guide.
I wanted to suggest something else but I saw that you apparently found an answer to your problem. The most common issue that stopped me from passing the black screen was because of the amount of resources that I made available for the vm especially on memory. I also tried the xForce Mode before, but that didn’t seem to help me at that time, So that’s why I never posted it since I couldn’t verify. Still I’m happy that you found a Solution and made this post even better by sharing this valuable information.
I hope that after the black screen issue, the rest went smoothly again 😊. If not, feel free to ask again. I cannot always respond immediately (we probably also live in different time -zones), but I will do my best to help or respond as fast as possible.
So once again thanks you for sharing your feedback and solution, it can help others who experience the same issue and only makes the post better. Really, really appreciate that you took the time and effort to comment back with your solutions as well.
The best New Years wishes and regards.
Samir
THANK YOU!
Your instructions work flawlessly IF you have the right Android image and don’t miss any configuration steps.
No problem at all,
Happy that the post helped you.
Have fun
[…] + Read More […]